LinkedIn Server-Side Tracking with Tag Manager: Step-By-Step Guide

Server-Side Tracking
- 25 Jan, 2024
- 848 Views
- 0 Comment
Snapchat’s server-side tracking has revolutionized the way tracking is done on the platform, offering new possibilities and challenges for marketers and developers. By leveraging server-side APIs, marketers can gain access to more accurate data and overcome limitations imposed by privacy restrictions and ad blockers. This increased data fidelity can lead to better campaign performance, improved ad targeting, and a deeper understanding of user behavior on Snapchat. In this article, we will explore the evolution of Snapchat tracking, the process of implementing server-side tracking, and the comparison between server-side tracking and client-side tracking.
Key Takeaways
- Understanding on the Snapchat Server-Side Tracking, why and what and how it works
- What is Snapchat Conversion API
- Setting up Snapchat Server-Side Implementation with google tag manager server-side container
- Best practices
Understanding on Snapchat-Server Side Tracking
What is Snapchat Server-Side Tracking?
Forget browser blockades! Snapchat’s Server-Side Tracking (SDE) sends user actions (ad clicks, form submissions) to your server first, then to Snapchat. This bypasses restrictions and offers cleaner, more accurate data. Plus, you control what data gets shared, boosting privacy and transparency. It’s a secure tunnel for campaign success, minus the browser hassles. Explore SDE for privacy-conscious, powerful campaign analysis.
Why Snapchat Server-Side Tracking?
While Snapchat server-side tracking (SDE) isn’t strictly “needed,” it offers several advantages over traditional client-side tracking, making it increasingly attractive for businesses:
1. Overcoming data limitations:
- Privacy tools: Users often employ ad blockers and privacy extensions, hindering data collection through client-side pixels. SDE bypasses these limitations, ensuring you receive complete data.
- Browser restrictions: Cookie policies and third-party cookie deprecation restrict data accessibility. SDE avoids these roadblocks by sending data directly from your server.
2. Enhanced data accuracy:
- Server-side control: By filtering and processing data on your server, you ensure cleaner, more accurate information reaches Snapchat. Client-side tracking can be susceptible to errors and incomplete data.
- Richer data sets: SDE allows sending additional information beyond basic event data, enabling more robust analysis and campaign optimization.
3. Improved privacy and control:
- Reduced user tracking: Data collection happens on your server, not directly on user devices, enhancing user privacy perception.
- Granular control: You choose what data gets sent to Snapchat, allowing for more privacy-conscious data sharing and compliance with regulations.
How Snapchat Server-Side Tracking Works?
Imagine a Snapchat ad campaign without pesky browser restrictions and privacy shields messing with your data. That’s the beauty of Snapchat Server-Side Tracking (SDE). Here’s how it works:
- User interacts with your ad: They click on it, open a linked website, or complete an action.
- Data detours to your server: Instead of going straight to Snapchat, the information (e.g., ad ID, action type) gets sent to your secure server.
- Your server acts as a filter: You can choose what data to keep and what to discard, ensuring privacy and compliance.
- Clean data travels: The filtered information, free from browser limitations, gets sent to Snapchat for analysis.
- Campaign insights revealed: It uses this data to measure performance, optimize ad delivery, and target the right audience.
Setting up Snapchat Server-Side Tracking in Google Tag Manager Server Container
Step 1: Create Tag in Server container
Navigate to the Tags section and click on New.

Step 2: Set up Tag Configuration
Start by creating a new tag and give it a clear name. This helps easily identify its purpose. Instead of selecting a pre-defined type, click “Discover more tag types in the Community Template Gallery.” Among the available choices, select the “Snapchat Conversion API ServerSide” template.

Step 3: Add Pixel ID to the Tag
Now, under the Pixel ID , add your snap pixel ID from the Snapchat Business Manager Account.
![]()
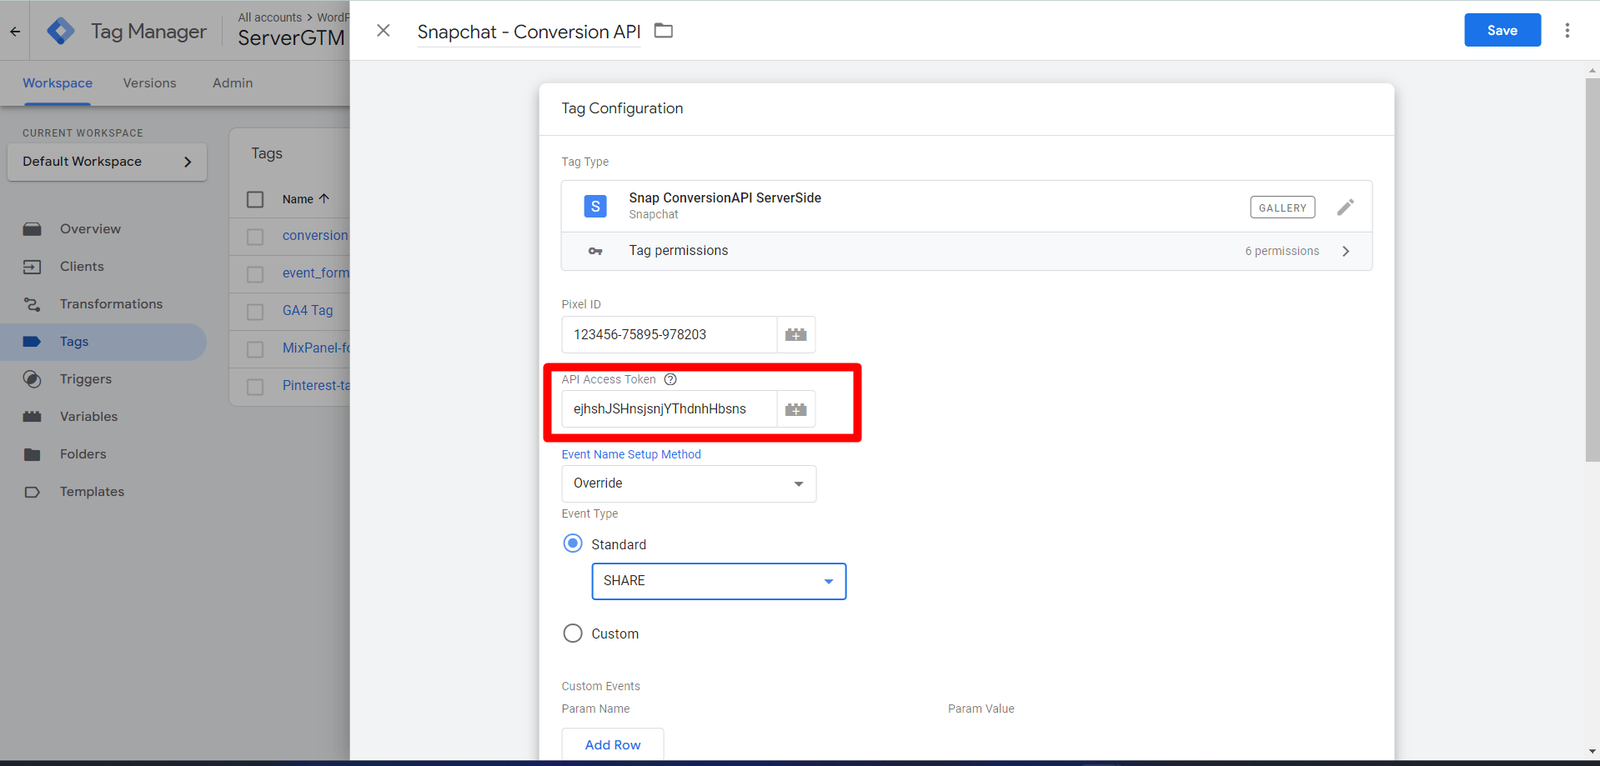
Step 4: Add API Access Token
For adding the API Access Token, then go to the Snapchat Business Manager -> click on Business Detail and scroll down to the Conversion API Tokens. Click on ‘Generate Token’ and you will be able to see the Token is generated. Copy and add to the API Access Token field.
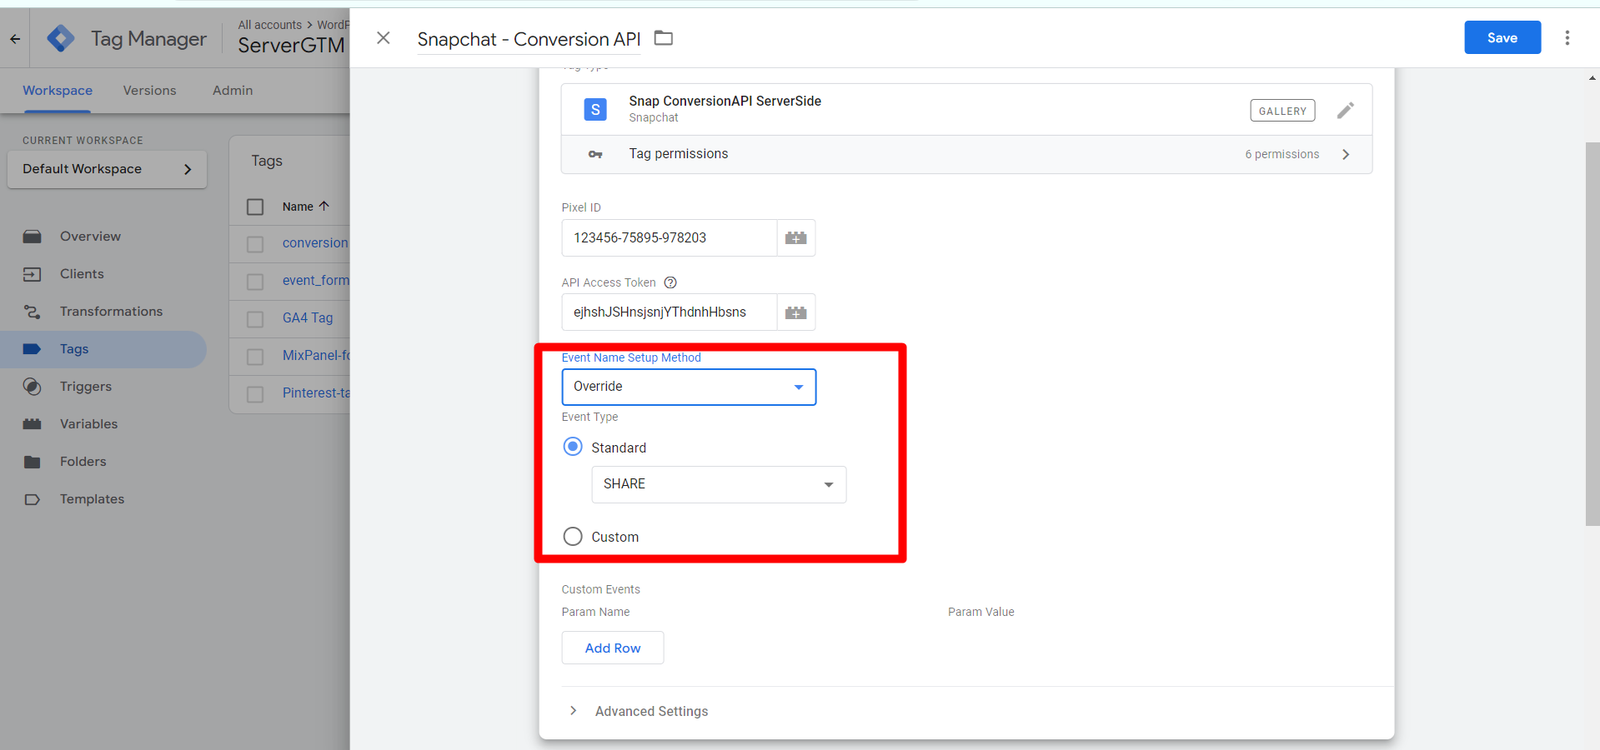
Step 5: Setting up Event Name
Simply choose “inherit from client” here. But if you’re keen on focusing on a specific event, like purchases, choose “override client data” and type in the event name you want Pinterest to receive. Remember, for specific events, creating a custom event trigger is also necessary.
Step 6: Setup Trigger
Choose the “GA4 client trigger” and let it work its magic. But if you have a specific event in mind, like purchases, you can use a “custom event” trigger. Once the trigger is saved, add it to your Snapchat Conversion API and click “Save.” Boom! Your CAPI is ready to go, capturing valuable data to unlock insights into your campaign performance.

Step 7: Set Event ID in Website Container
Dive into “Variable Configuration” and by clicking “Discover more tag types in the Community Template Gallery.” Search for the key you seek: the “Unique Event ID” variable. Give your variable name and Save it.

Step 8: Add Event ID in Website Container
Open your Snapchat Pixel Tag into the website container, and into the Additional Initialization Data add the Key and value of Event ID which we have created in step 7.

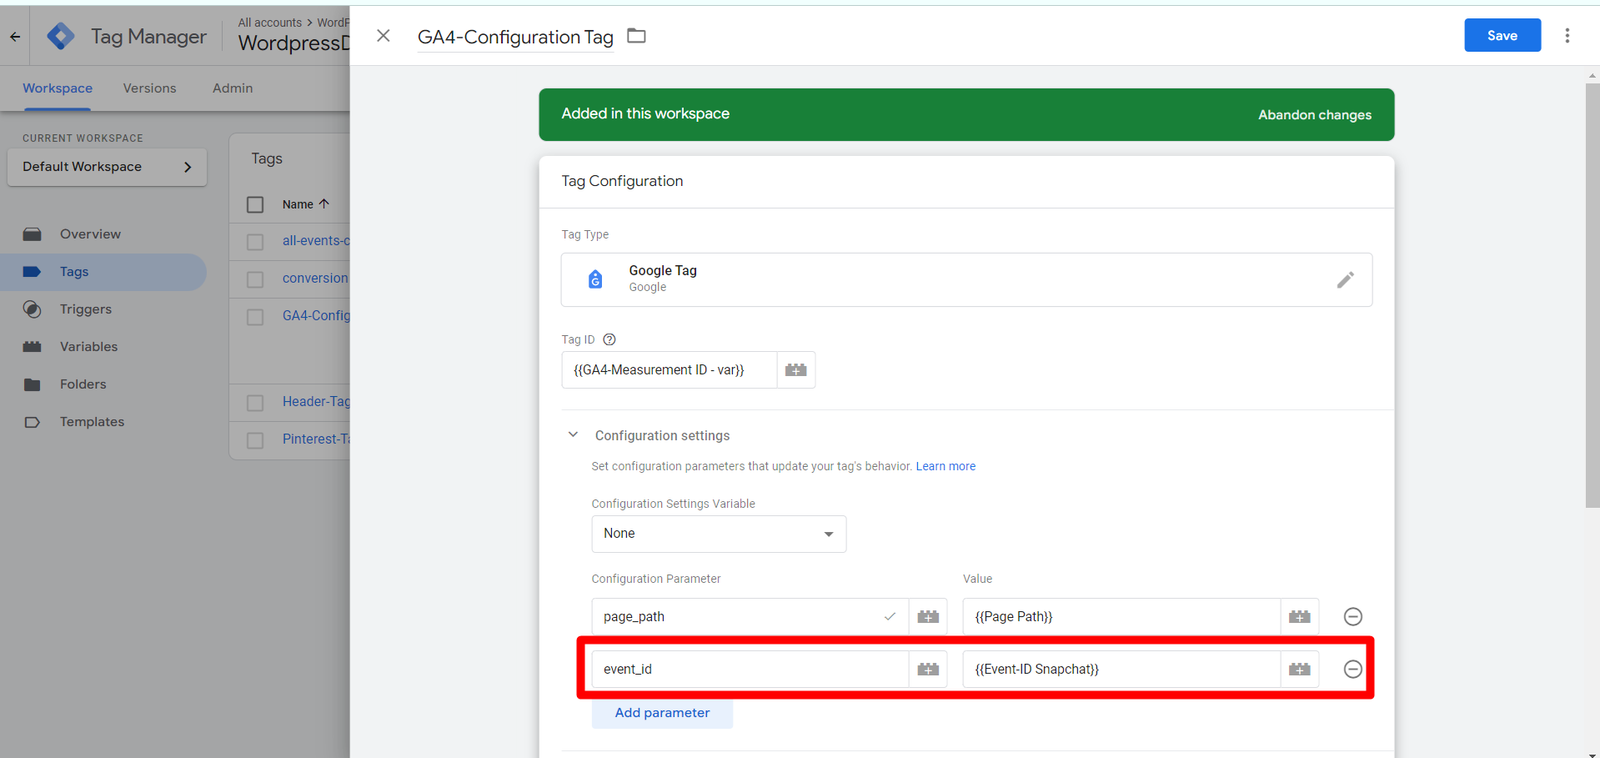
Step 9: Add Event ID in Google Tag
Add the event_id into the Google Tag under the additional parameters.
Step 10: Add Event ID in Server Container
Create a ‘Event Data’ variable and add key path as ‘event_id’ into the variable configuration. Save with name.

Step 11: Test and Preview both GTM web and server side
The implementation has been setup. Test and Preview the google tag manager.
Best Practices
Privacy and Compliance:
- Comply with data privacy regulations: Ensure your SDE implementation complies with relevant regulations like GDPR and CCPA.
- Minimize data collection: Only send necessary data, avoiding sensitive information.
Technical Setup and Configuration:
- Use a secure server: Ensure your server is secure and protected against unauthorized access.
- Monitor performance: Regularly monitor your SDE performance for errors or discrepancies.
- Test thoroughly: Test your SDE implementation thoroughly before launching it live.
Data Management and Analysis:
- Analyze data regularly: Regularly analyze the collected data to gain insights and optimize your campaigns.
- Choose relevant events to track: Track only events that are valuable for your analysis and optimization efforts.
- Leverage rich data sets: Send additional information beyond basic events for deeper insights.
Conclusion
In conclusion, mastering Snapchat server-side tracking with Google Tag Manager unlocks a treasure trove of benefits for marketers. By leveraging server-to-server communication, you gain access to more accurate conversion data, overcome privacy limitations, and optimize campaigns for maximum impact. This guide equips you with the knowledge to understand Snapchat’s server-side tracking system, utilize the Conversion API, implement it seamlessly with Google Tag Manager, and establish best practices for reliable data collection. Take control of your Snapchat marketing strategy and unlock its full potential with server-side tracking!
DROP US A LINE
Connect with Us
Stay ahead in the ever-evolving world of marketing technology by connecting with Advaana Inc. Let's work together to transform your marketing technology landscape. Connect with us today and take the first step towards achieving your MarTech goals. image

Call Us at
(717) 461-9080

Send an Email at