Understanding the Website Cookies: Types, Uses, and Benefits

Server-Side Tracking

- 22 Jan, 2024
- 1.1k Views
- 0 Comment
Feeling lost in the world of Google Ads data? Want to improve privacy, performance, and control over your campaign measurement? Look no further than server-side tracking! This article unveils the secrets of this powerful technique. We’ll delve into what server-side tracking for Google Ads is and why it’s a important. Then, we’ll guide you through the steps of setting it up using Google Tag Manager, so you can unlock the potential for accurate, privacy-conscious measurement of your campaigns. Are you ready to embrace the future of conversion tracking? Dive in and learn how to leverage google ads server side tracking!
Table Takeaways
- The Basics of Server-Side Tracking
- What is Google Ads Server Side Tracking?
- Why Google Ads Server Side Tracking?
- Setting Up Google Ads Server Side Tracking GTM
The Basics of Server-Side Tracking
Defining Server-Side Tracking
Server-side tracking refers to the process of collecting and sending data from the server side of a website or application, rather than relying solely on client-side tracking. This approach offers greater control over data collection and enhances data privacy by reducing reliance on user-side technologies.
How Server-Side Tracking Differs from Client-Side
Server-side tracking differs from client-side tracking in several key ways. Control is a significant factor, as server-side tracking allows for more control over data collection and processing. Additionally, privacy is a major consideration, with server-side tracking offering enhanced privacy protection compared to client-side methods. This difference is particularly important in the context of evolving privacy regulations.
What is Google Ads Server Side Tracking?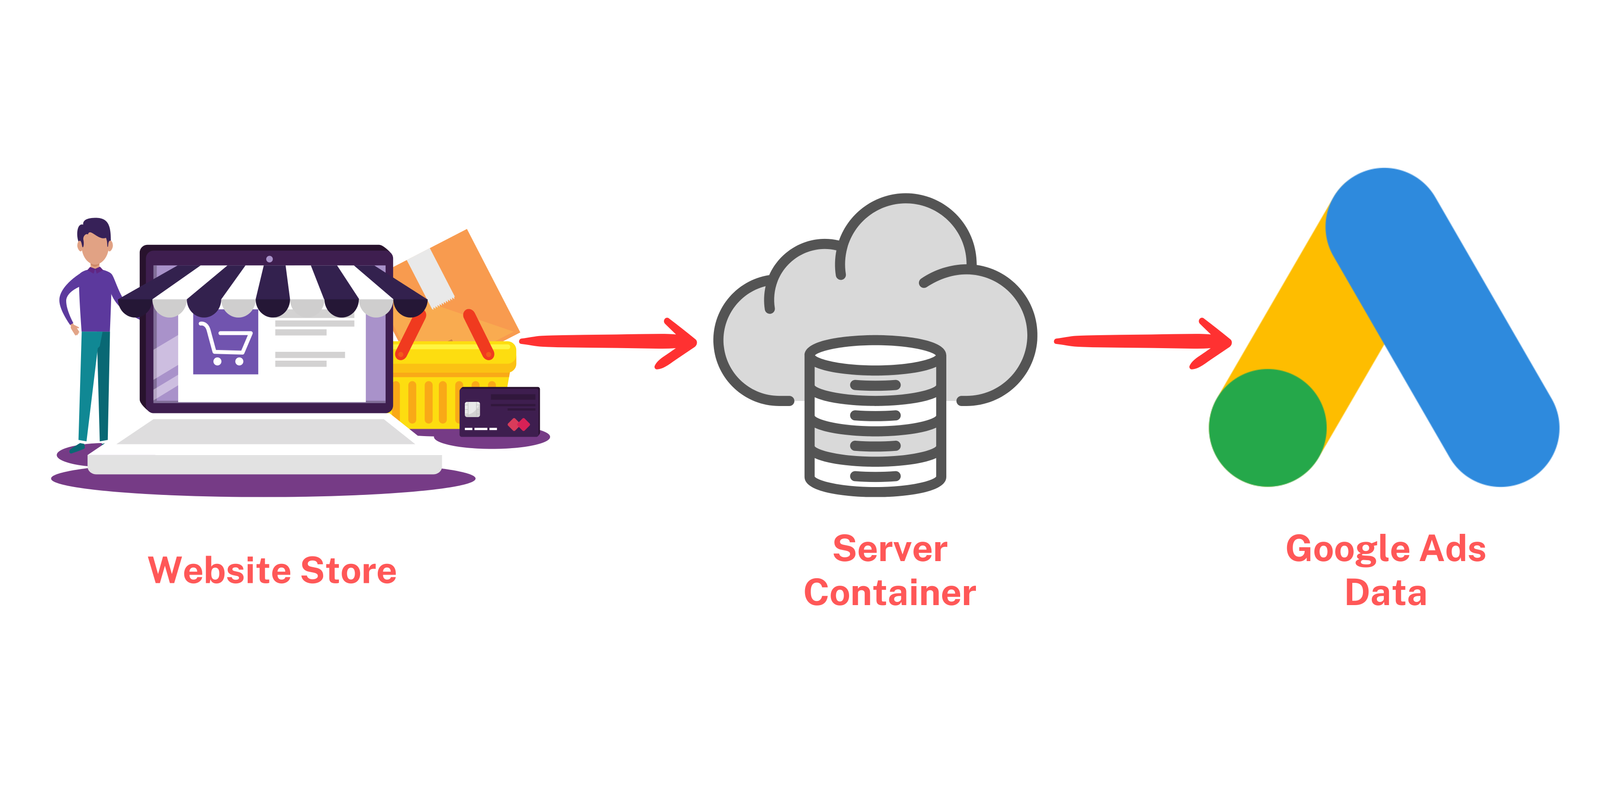
Forget browser roadblocks and privacy concerns! Google Ads Server side Tracking takes your campaign measurement to a whole new level. Unlike the traditional method where pixels and cookies peek into users’ browsers, this one keeps things private.
Here’s the twist: instead of directly tracking on the user’s side, it sends data to your own server first. This gives you the upper hand:
- Privacy Matters: You control what data goes to Google Ads, respecting user preferences and privacy tools.
- Data Secured: No more relying on browser restrictions or cookies that can crumble. Your server holds the information securely.
- Performance Boost: Less code on the user’s browser means faster website loading times. Happy users, happy conversions!
Why Google-Ads Server Side Tracking?
There are several reasons why you might consider using Google Ads Server side Tracking (SST):
Enhanced Privacy:
- Respect user preferences: Google Ads Server side tracking avoids relying on cookies and client-side tracking, which can be blocked by privacy tools and raise user concerns. You have more control over what data is collected and shared, fostering trust and respecting user privacy.
- Future-proof your tracking: As privacy regulations evolve and cookie reliance diminishes, google ads server side tracking offers a sustainable solution for accurate conversion measurement.
Improved Performance:
- Faster website loading: By minimizing code running on the user’s browser, google ads server side tracking contributes to faster page load times, leading to a better user experience and potentially higher conversion rates.
- Reduced reliance on flaky technologies: No more worrying about ad blockers or browser restrictions affecting your tracking data. Google ads Server side tracking sends data directly from your server, ensuring accurate measurement.
Greater Control and Accuracy:
- Own your data: Keep your conversion data on your own server, giving you more control over its security and usage. You can choose what information to share with Google Ads server side tracking and other platforms.
- More accurate insights: By avoiding browser limitations and potential data loss, server side tracking provides more reliable and accurate conversion data for better campaign optimization and decision-making.
Setting Up Google Ads Server Side Tracking GTM
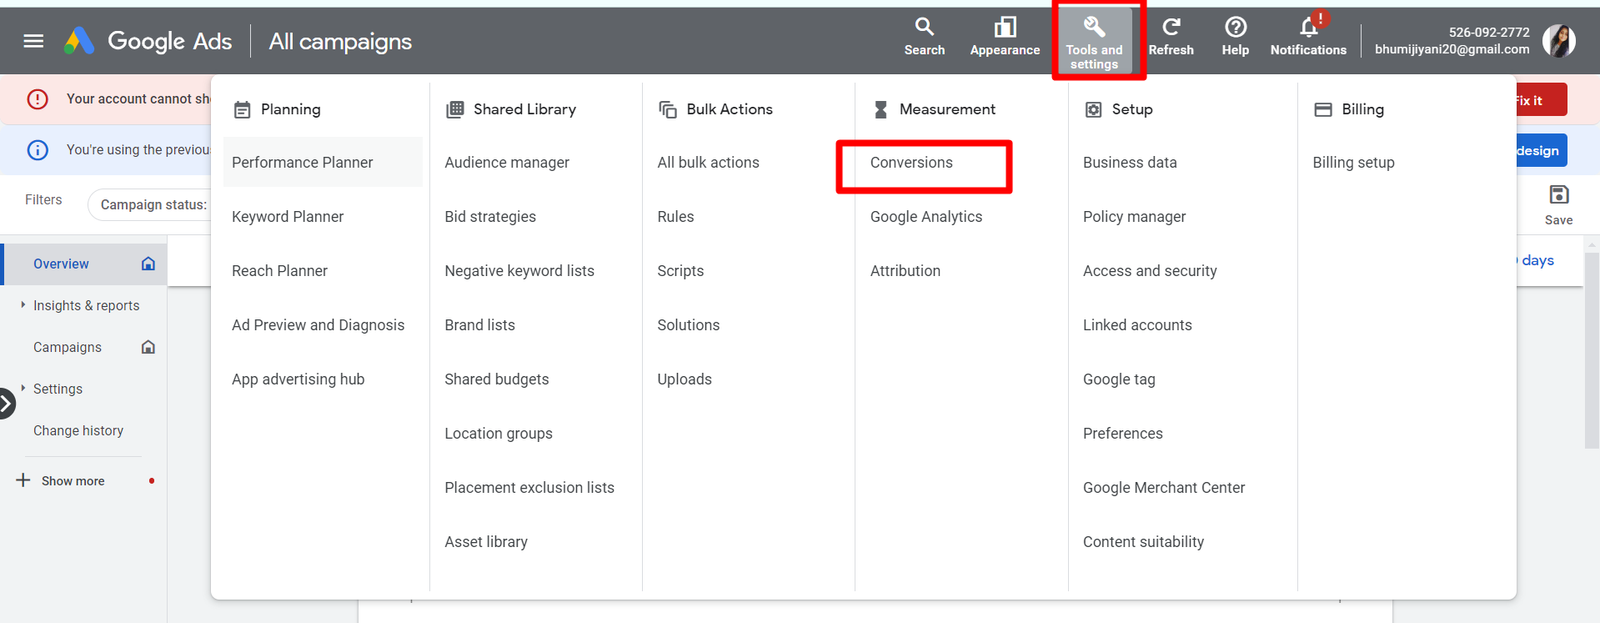
Step 1: Set Up Conversion Settings into the Google Ads first
Navigate to your Google Ads Account, then move to the Tools and Settings -> Conversions.
Step 2: Set up Conversion Action
To measure your desired action, first select it from existing conversion actions. If it’s new, click “New Conversion Action” and name it. Now, choose the type of conversion you want to track (e.g., purchase, contact inquiry). Specify its value and categorize it appropriately. That’s it! You’re set to track and analyze the performance of your chosen action.

Step 3: Setting up the Conversion Tag
After setting up the conversion action, click on it and Select the option “Tag SetUp” and Select the option “Use Google Tag Manager”.

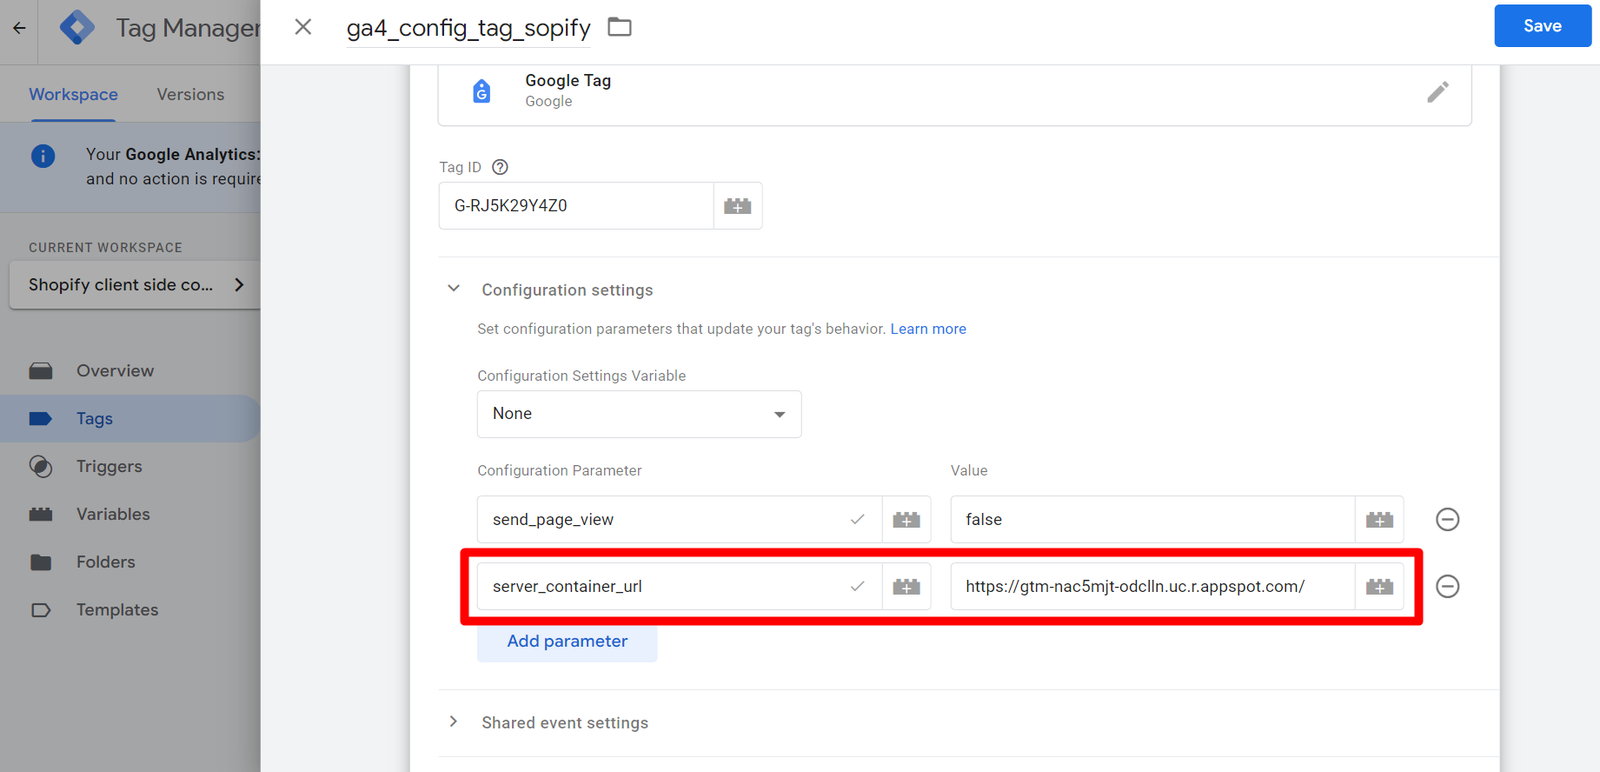
Step 4: Set send_server_url parameter into the Web container GTM
Once you have Server side container, you have to set up the send_server_url to url of your server in the web container GTM.
Here’s how to find it:
- Navigate to your server container in Google Tag Manager.
- Click on the Server Container ID displayed at the top right corner.
- Locate the ‘Default URL’ field and copy it.
Paste the copied URL into the value field for the ‘server_container_url’ parameter.
Step 5: Create a Tag in Google Tag Manager Server Container
In Google Tag Manager, navigate to your server container, then head to the “Tags” section and click “New.” If you haven’t yet configured GA4 to feed data into this server container, hold off! It’s essential to start with step 1 on implementation of server-side tracking GA4 before proceeding here. Remember, a solid foundation is key!

Step 6: Select the Tag
After clicking on ‘New’ Tag, then click on ‘Tag Configuration’ and select the ‘Google Ads Conversion Tracking Tag’ as the tag type.
![]()
Step 7: Configured the Google Ads Conversion Tag
Setting up your Conversion Linker tag is straightforward! First, borrow the Conversion ID and Conversion Label from your Google Ads account and park them in their designated fields.
Next, consider adding a variable reflecting the conversion’s value (like purchase amount), but it’s optional. Finally, pick your currency hero: either use a dynamic variable that adapts based on your data, manually enter a static code (like INR for rupees), or let GA4 event data handle it automatically.
And woohoo! Your Conversion Linker tag is prepped to capture and report those important conversions.
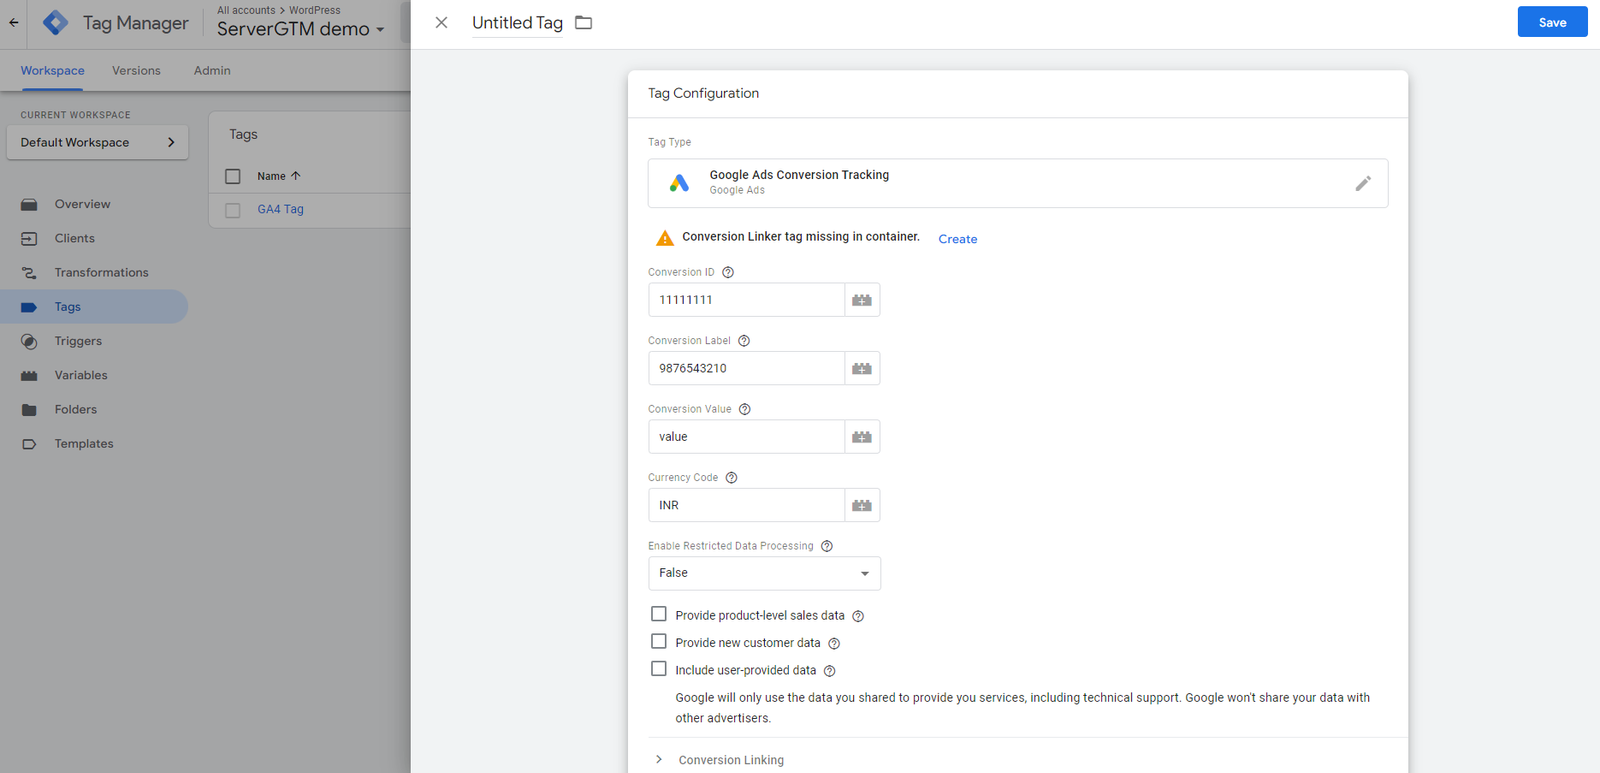
Step 8: Set up the ‘Conversion Linker’ Tag if it is not created
Are you getting the message on the tag configuration screen? Then add the conversion linker.

Step 9: Create a Trigger
Head to the “Triggers” section and click the plus sign in the top right corner. Now, let’s assume you want to track website purchases. Don’t worry, if you’re aiming for a different action (signups, applications, form submissions, cart activity, etc.), the process is similar – just choose the relevant event/trigger!

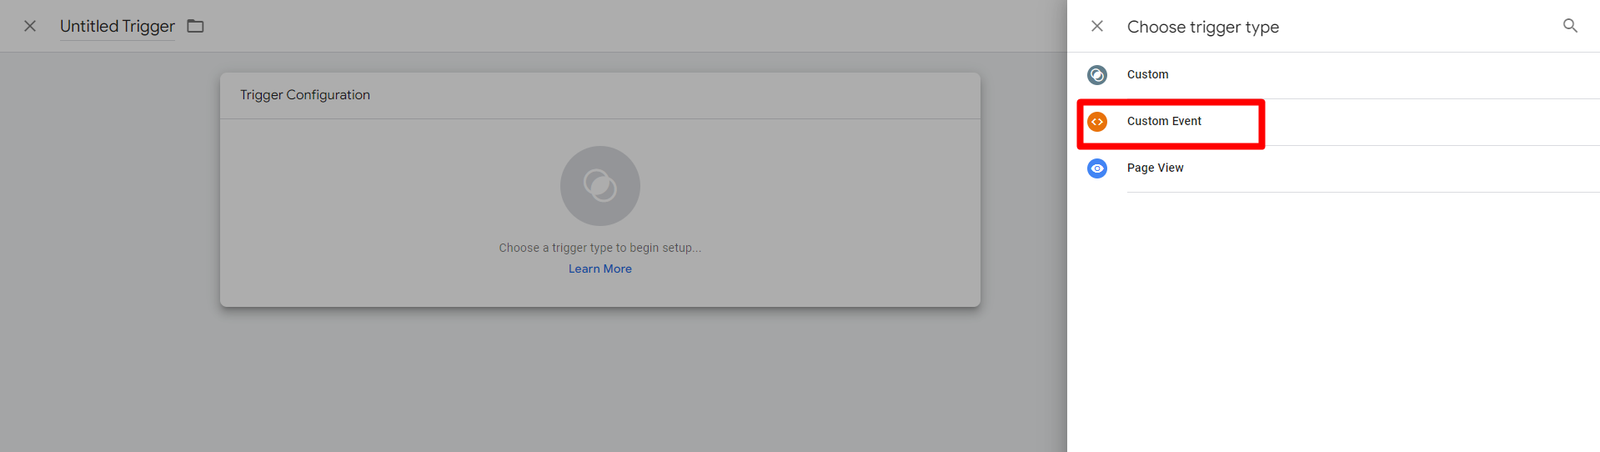
Step 10: Select the Trigger Type
Name the trigger and click ‘Trigger Configuration’. Next, select “Custom Event” as the trigger type.
Step 11: Configure the Trigger ‘Custom Event’
After clicking on the ‘Custom Event’ and under that event name section, add your event name. Select the ‘Some Custom Event’ radio button under the ‘This Trigger Fires on’.
Add the condition into the ‘Fire this trigger when an Event occurs and all of these conditions are true’ section., set the [Event Name] [equals] [form_submit]. Save the trigger and save the tag.

Step 12: Set up the GA4 event Tag into the Client-Side GTM
In your web container workspace, add a Google Analytics: GA4 Event tag. In Configuration tag, select the Google tag for your website. Enter the event name that corresponds to the conversion event.

Step 13: Validate or Test your data into the GTM Preview Mode
Once you start sending data with the server container, you can check to see if it’s working properly by following these steps:
- Open your server GTM container, click on the Preview tag. Tag assistant will load server container by adding your website URL.
- In that Tag tab shows you all the tags which are fired. Also check all the tag configuration.
Conclusion
In conclusion, this article explored the advantages of Google Ads Server Side Tracking (SST) for campaign measurement. It offers greater privacy control, improved website performance, and more accurate data compared to traditional client-side tracking. You learned about the core principles of server side tracking and how to set it up using Google Tag Manager. While there are technical considerations and potential costs, SST can be a change for businesses that prioritize user privacy, robust data insights, and future-proof tracking for their Google Ads campaigns.
DROP US A LINE
Connect with Us
Stay ahead in the ever-evolving world of marketing technology by connecting with Advaana Inc. Let's work together to transform your marketing technology landscape. Connect with us today and take the first step towards achieving your MarTech goals. image

Call Us at
(717) 461-9080

Send an Email at