A Complete Guide to Integrating Outbrain Pixels with Google Tag Manager

Conversions Tracking

- 3 Jan, 2024
- 838 Views
- 0 Comment
Want to truly understand how users interact with your website or app? Look no further than ContentSquare Pixel! This powerful tool goes beyond basic analytics, offering deep insights into user behavior. This guide will unveil the secrets of the ContentSquare Pixel tracking from its core function to seamless integration with Google Tag Manager. We’ll cover everything you need to know to set up and unlock valuable data that can revolutionize your website or app.
Key Takeaways
- What is ContentSquare Pixel Tracking
- Benefits of Using ContentSquare Pixel
- Function of ContentSquare Pixel
- Setting up ContentSquare Pixel with Google Tag Manager
- Creating a ContentSquare Account
- Adding the ContentSquare Pixel to Google Tag Manager
- Testing and Troubleshooting
- Analyzing Data with ContentSquare
What is ContentSquare Pixel Tracking?
ContentSquare Pixel, also referred to as the “Main Tracking Tag”, is a snippet of code used to gather user behavior data on your website or mobile app. It acts like a tiny sensor, anonymously tracking user interactions such as clicks, mouse movements, scrolls, and more.
This data is then sent to ContentSquare’s servers for analysis and transformed into actionable insights and recommendations for your team.
Benefits of Using ContentSquare Pixel
ContentSquare Pixel tracking offers several benefits for businesses looking to improve their user experience and website/app optimization. Here’s a more detailed breakdown of the key advantages:
- Behavior tracking: Go beyond page views and understand how users interact with your site/app (clicks, scrolls, heatmaps, rage clicks).
- Session replay: Watch individual user sessions to see their exact journey and identify pain points.
- Quantify impact: Measure the effectiveness of changes made to your site/app based on user behavior data.
- Prioritize improvements: Focus on areas with the biggest impact on conversion rates, revenue, or engagement.
- Improved conversion rates: Optimize your site/app for better user flow and reduce drop-off points.
- Competitive advantage: Gain insights into user behavior that your competitors may not have.
Function of ContentSquare Pixel
The ContentSquare Pixel tracking, also known as the “Main Tracking Tag”, has two main functions:
1. Data Collection:
- It acts like a tiny sensor embedded in your website or mobile app, anonymously tracking user interactions.
- It doesn’t collect any personal information (PII) that could identify individual users.
2. Data Analysis and Insights:
- The collected data is sent to ContentSquare’s servers for processing and analysis.
- This analysis transforms the raw data into actionable insights and recommendations. These can include:
- Session replays: Watching individual user journeys to understand their experience.
- Funnel analysis: Identifying drop-off points in your conversion funnels.
- Form abandonment analysis: Understanding why users are leaving forms incomplete.
Setting up ContentSquare Pixel with Google Tag Manager
Before you set up ContentSquare pixel tracking, there are a couple things to grab.
First, you’ll receive a unique 13-character Tag ID once you start your partnership with them. This ID is specific to your website and won’t track data from anywhere else.
In addition, you can include up to 20 custom variables to provide more context about your users and pages. These variables typically come from your website’s datalayer or similar JavaScript objects.
Creating a ContentSquare Account
To get started with ContentSquare pixel tracking, you need to create a ContentSquare account. Follow these steps:
Step 1: Visit the ContentSquare website and click on the ‘Sign Up’ button.
Step 2: Fill in the required information, such as your email address and password.
Step 3: Agree to the terms and conditions and click on the ‘Create Account’ button.
Step 4: Once your account is created, you will receive a confirmation email.
After creating your ContentSquare account, you will be able to access all the features and benefits that ContentSquare has to offer.
Adding the ContentSquare Pixel to Google Tag Manager
To integrate the ContentSquare Pixel tracking into Google Tag Manager, follow these steps:
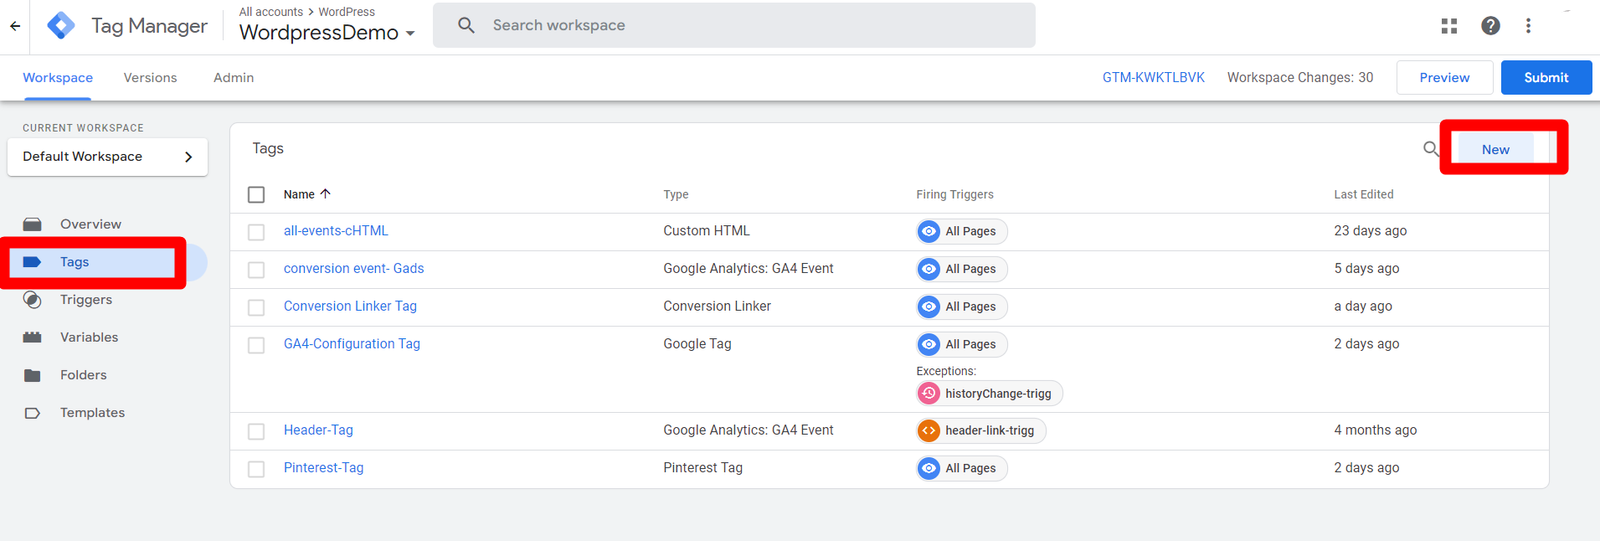
Step 1: Add a tag. Click on ‘Tags’ in the left sidebar. Click on ‘New’ to create a new tag.
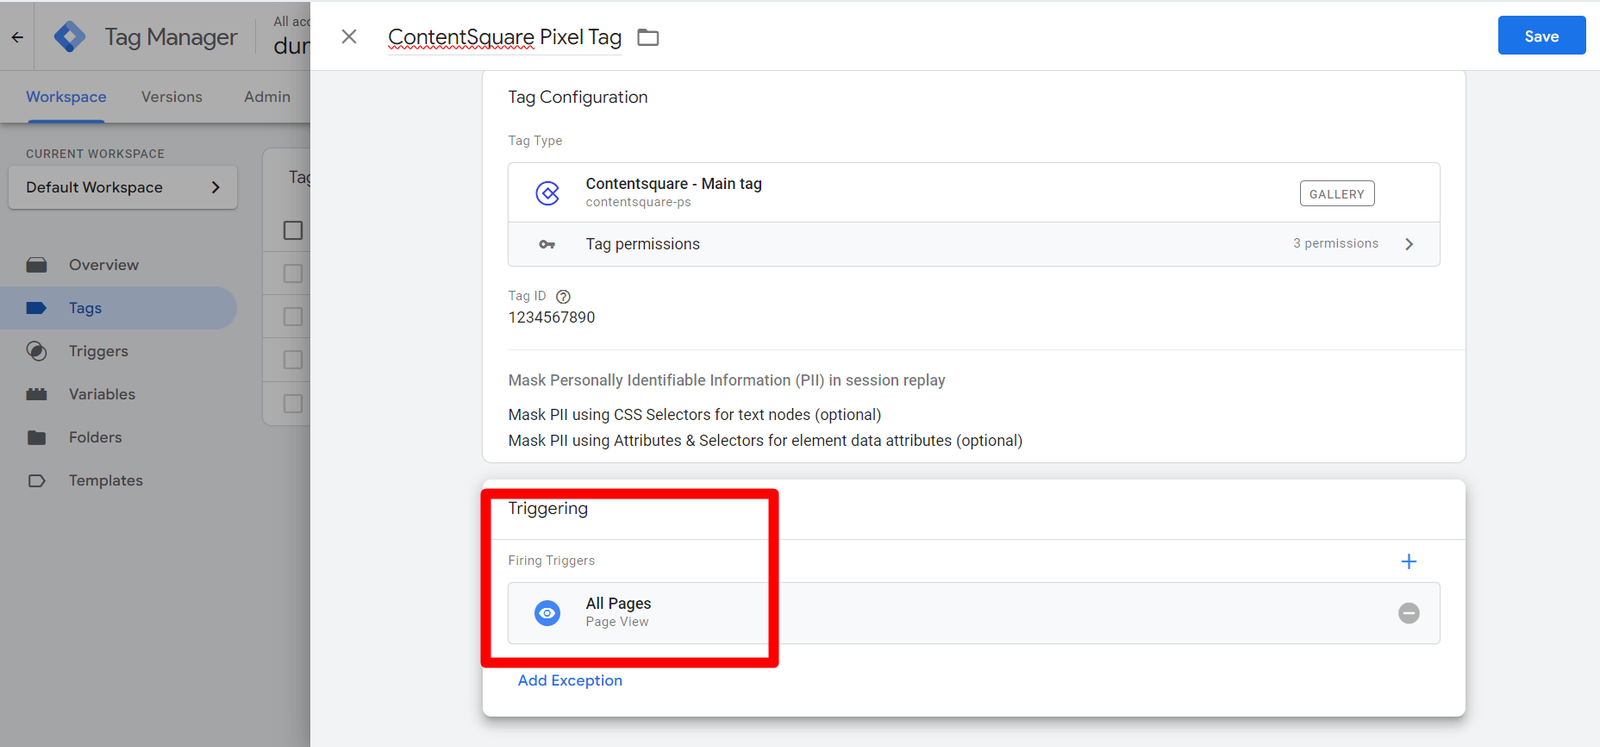
Step 2: Name the tag and select the tag type as ‘ContentSquare – Main Tag’.

Step 3: Copy the Tag ID and add into the tag.
![]()
Step 4: Configure the Trigger.
Step 5: Test and publish the results.
Testing and Troubleshooting
When integrating ContentSquare Pixel tracking using Google Tag Manager, you may encounter some common issues. Here are a few troubleshooting tips to help you resolve them:
- Pixel not firing: If you notice that the ContentSquare Pixel is not firing on your website, double-check the installation steps and make sure the code is implemented correctly.
- Data discrepancies: In some cases, you may notice discrepancies between the data in ContentSquare and other analytics tools.
- Page load speed: Adding the ContentSquare Pixel code to your website can impact page load speed.
- Tag Manager conflicts: If you have other tags or scripts implemented through Google Tag Manager, conflicts may arise.
- Browser compatibility: Test the integration across different browsers to ensure that the ContentSquare Pixel functions properly on all platforms.
Analyzing Data with ContentSquare
ContentSquare pixel tracking isn’t just a data repository; it’s a treasure trove of insights about your website visitors. Let’s delve into how to interpret this wealth of information:
Visualizing the Customer Journey:
- Intuitive Flow Charts: Witness the dance of your users with your website. See how they flow from page to page, revealing paths taken, roadblocks encountered, and triumphant exits.
Structured Quantitative Data:
- Metrics Made Clear: Numbers talk, and ContentSquare translates them into a language you understand. Tables filled with page views, bounce rates, and conversion rates become a compass, directing you towards the pages that shine and those that need a polish.
Combining the Power of Both:
- Data-Driven Decisions: Don’t let the visual and quantitative live in isolation. See which pages boast high engagement but low conversion, or identify drop-off points with seemingly high traffic.
Conclusion
In conclusion, by implementing the ContentSquare Pixel tracking and leveraging its capabilities within Google Tag Manager, you gain valuable insights into user behavior on your website or app. This empowers you to optimize content, improve user experience, and ultimately drive conversions. Remember to gather your unique Tag ID and consider including custom variables for richer data analysis. With ContentSquare’s intuitive platform, you can then translate this data into actionable strategies to enhance your digital presence.

DROP US A LINE
Connect with Us
Stay ahead in the ever-evolving world of marketing technology by connecting with Advaana Inc. Let's work together to transform your marketing technology landscape. Connect with us today and take the first step towards achieving your MarTech goals. image

Call Us at
(717) 461-9080

Send an Email at